Friday, October 13, 2017

Levels of Anger


Since I've begun this year as our behavior interventionist, I have seen many of the students on my case load struggle to self regulate. This can then lead to them shutting down, becoming verbally and/or physically aggressive, threatening others, and engaging in power struggles. As a classroom teacher it can be incredibly hard when having to deal with these behaviors in the moment. Research shows that when kids are stressed, their amygdala is activated causing a flight, fight, or freeze response. Once this happens, it can take 30-90 minutes for them to calm back down for higher order thinking.

Yep. 30-90 minutes.  For some teachers, that can be an ENTIRE subject... or ENTIRE class period! (Interested in more brain research?? Google Eric Jensen. Seriously. Do it.)

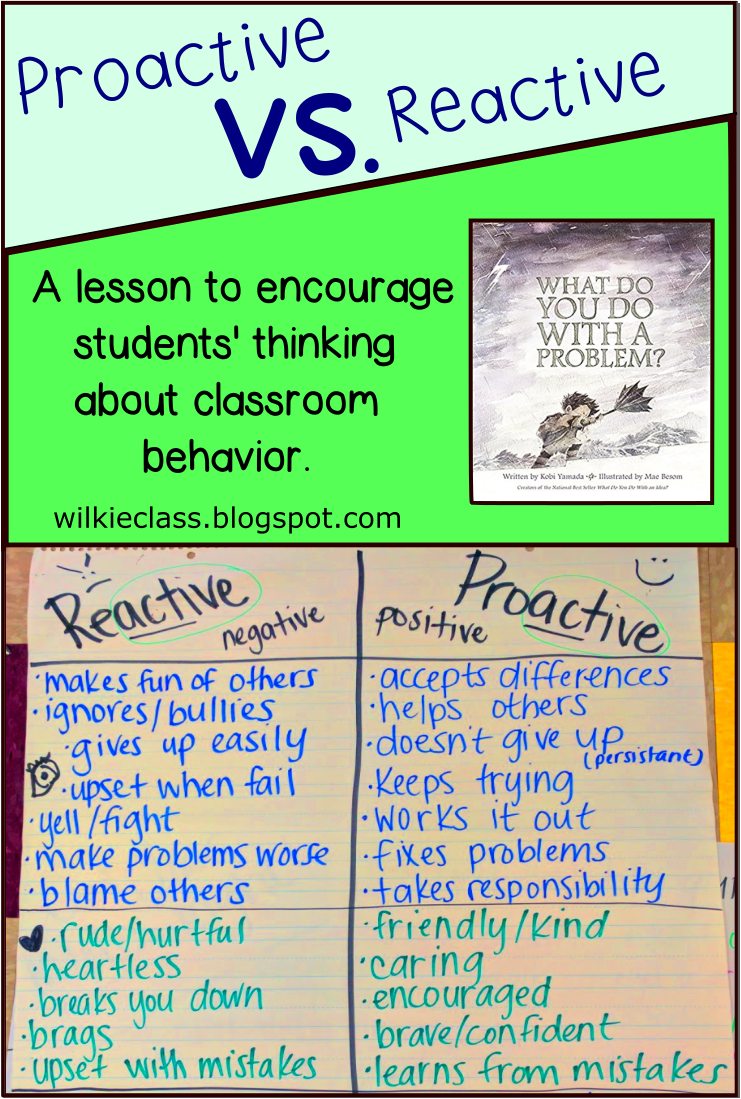
As a preventative this year, I began reading up on the Incredible 5 Point Scale. This is something that can be used on a wide range of situations, but I chose to look at it through the lens of anger. I explained that different things can 'trigger' our anger. As this happens, we can move through different levels before we completely lose control of ourselves. Noticing these different levels can help regulate ourselves so that we calm down and not get in trouble. As we went through the different levels, we built the anchor chart below together.


Before the lesson I made sure to have emotions written on sentence strips, pictures drawn for visuals, colored papers written with the five levels, and a large thermometer drawn to give a concrete example of how anger can build up like temperature. This way we could piece together our chart and I didn't have to use time writing everything.

To apply the levels, I used Inside Out and the scene from the dinner table. I had students focus on the daughter, and had then identify as they saw her escalating through different levels of anger. We paid attention to how she LOOKED, what/how she SAID things, and inferred how she might FEEL. Here's the LINK to the video.

Students also have their own personal graphic organizer.


I did also have them circle triggers of their own, and checkmark ones that REALLY got them angry. I left room in the trigger box to add more that they may come up with on their own.

I found that during the mini lesson I focused more on an overview of the levels rather than students filling out their graphic organizer. That came on an individualized basis as situations arose where the student and teacher could analyze what was going on, what level the student was on, and how looked or felt. 

Let's say the situation was that the student began to kick chairs and yell loudly that he was going to throw one. After the student was out of the classroom and in a place to talk, the teacher would ask what happened. They would then ask what level they were on? In this case, that most likely is a 4 or 5. The teacher and student discuss how that LOOKS, SOUNDS, and FEELS. The teacher should also ask what else happened that led to the point of them throwing chairs. What were the triggers? What level was the student on at that point? Again the teacher asks how that LOOKS, SOUNDS, and FEELS. At first, some levels may be skipped until they are experienced. The second column that says count to 10 has ways the student can calm down at each level. I highly encourage students who are at a level 4 or 5 to take a break. A level 5 I explain how that can mean moving to a different room with an adult to be out of the situation. Here's an example of one filled out for a student. 


As students this year have begun to experience anger, this has been SUCH a helpful resource. Already this year I have been able to figure out what is causing students to escalate to a level 5, and how to help them BEFORE they get that far. Just recently I had a student tell me that another student was bothering them, which caused them to be at a level 3. This then caused them to poke at the teachers board, which led to a teacher redirect, which then led to them escalating to level 5. I was able to discuss with them how as SOON as they are bothered, they could STOP, count to 10, and then go sit away in safe zone BEFORE they got to a level 5.

I love being able to bring students in to look at the bulletin board and use it as a springboard for problem solving conversations. It's also been so helpful having students have their own individualized ones as well to continuously go back to and to identify strategies to help them calm down. Students are beginning to recognize their levels and verbalize what they need to do to calm themselves. While it is still a long process, this has been a great visual for self assessment and self regulation.

UPDATE: I'm adding in this as well.
This I created for students to carry. It takes the anger process a step further and helps students to know that once they've calmed down, they can solve the problem (the trigger) and/or receive consequences for it. Just another twist and a way to organize things!

Thursday, September 14, 2017

Proactive vs. Reactive


It's the beginning of the year and the honeymoon is REAL y'all! Things are jiving, behaviors are chill... but as the days go on... we start to hear talk that may resemble "STOP!" "Get out!" "You're so stupid!" "I can't do this".. etc, etc.

It's frustrating right? Especially after we've discussed school rules, created our own rules in the classroom, and have been working hard to build routines. Our school has 3 basic rules: Be safe, be respectful, and be responsible. They're great because so many things can fall into them.. but what about real life social skills?

If you've ever read or heard of the 7 habits of highly effective people, or the 7 habits of happy kids, you may know that the first habit is BE PROACTIVE. (For more info: The Leader in Me)

Get posters HERE.

So inspired by the first habit, one of the MOST important lessons I taught my students at the beginning of the year was the difference between being proactive and reactive. Short and sweet, proactive people are positive and solve/fix problems, while those who are reactive can be negative and make them worse.

While there are a TON of great read alouds where characters engage in a problem, many times with it getting worse before it gets better, my all time favorite to read for this lesson is What do you do with a problem? by Kobi Yamada. It tells of a character who struggles with a problem which grows bigger as he tries to avoid and ignore it. When he finally decides to face it, the character learns a valuable lesson about problems.

While we read, we also fill out an anchor chart comparing what both words LOOK like, FEEL like, and SOUND like. While the boy does not SAY the words listed on the chart, I borrowed a few from different growth mindset bulletin boards I had seen around (HERE and HERE)

I'm always amazed at how much these words are used throughout the ENTIRE school year. Many of the different behaviors exhibited throughout the school day fall into either category, and I've found it so helpful to be able to use these words to classify what type of behavior it is. It also helps students self reflect and make connections back to What do you do with a problem?

If you're interested in reading about how I implemented this lesson in class, scroll down! I use a structured mini lesson format, which you can read more about HERE if you'd like a quick and dirty on how I've organized it! This lesson runs longer than typical mini lessons usually do since I'm reading the WHOLE book, but I've still structured it the same.


MINI LESSON: Proactive vs. Reactive (30 minutes)

Connection: Ask students if they've ever been in a fight before. Maybe with their friends? Their parents? Their siblings? Allow them 30 sec think time. Have them turn and talk with a partner for a minute. Call them back together and ask for 2-3 shares. (TWIST: Ask them to tell about what their PARTNER shared) I agreed with many of their stories and mentioned a little about how my brother and I always fought as kids. I tell them that we encounter many situations throughout the day, and it's important to think about the choices we can make.

Teaching Point: Today we are going to focus on these different choices and classify them into two categories. On the anchor chart I write proactive and reactive.

I ask students to look at these words. What do they notice? Are there are prefixes, suffixes, smaller words they see in them? (Great connection back to vocabulary and what to do when encountering words we may not know) We see both words have ACT, so these have something to do with how we act. IVE is a suffix that makes these an adjective which describes how we act. PRO is a prefix that means forward, so in PROACTIVE you are moving forward to find a solution. This is positive. When we are REACTIVE we react to something before we think through our choices! This can be negative and can land us in trouble. I'll draw a smiley face and a frowny face next to the words to help with visual.

Next I'll show them the book we read and set the purpose for them to pay attention to the main character and think about what they DO, what they SAY, and how they might FEEL in the story while dealing with their problem. The first page or two I read, and then I will think aloud showing students what I notice about the character. From there we will decide if that's proactive or reactive. I'll begin to list it by the eye I've drawn (what the character looks like/what they do), the ear (what they say/how they sound), and the heart (emotions). The beginning of the book shows a lot of reactivity, and as it goes on the character shifts into a proactive mindset.

Active Engagement: I'll keep reading here and have students partner talk and then help me list more on the anchor chart. Rich discussions and connections will ensue.

Link: Now that we've created an anchor chart, I give them a graphic organizer and have them think about how they can turn reactive problems into class into something proactive. I link it back to the work we have done and how the anchor chart can help them with ideas.

Independent Work: 


Closing: I'm a HUGE fan of exit tickets. (READ MORE ABOUT THEM HERE) Usually I'll give them a scenario that they have to quick write on to show how to be proactive or a scenario that a person can change from being reactive to proactive. You could even show a visual and have them use a T-chart to write about how the person is being proactive/reactive.


And if you liked What do you do with a Problem, and are feeling this whole growth mindset thing, check out this book, What do you do with an idea? It tells the story of what can happen to our ideas as our confidence grows.

Saturday, August 19, 2017

Exit Tickets and Self Assessment with Marzano


So we've all heard of Marzano yes? You know that vocabulary guy who has lots of research into best practices?


Well, one (out of MANY) ideas I've gotten from his books had to do with student self-assessment. I've loved the idea of having students be involved in goal setting and teacher conferences, so when I found another idea on allowing for student reflection, I jumped at it!

To assemble them, I grabbed two pieces of cardstock and cut one of the pieces shorter. On the shorter piece I made sure to glue the self assessment picture down, and then laminated both pieces of cardstock seperately I then placed the shorter piece on top of the larger piece, and used decorative duck tape to adhere them together by taping the sides and bottom. Voila. A pocket! I stapled them in order right next to the door so students could drop things in easily on their way out.


So, the idea here is that there are 4 levels of understanding. At the end of a lesson, I would have my students do an exit ticket or perhaps take their graphic organizer/work for the lesson, and place it in the folder that they felt matched where they were in their learning of the concept. They 4 areas they could choose from were:

Novice: This is where students were completely confused and had a lot of questions.

Apprentice: Students still needed help or partners with their work, but they had a basic understanding.

Proficient: Students understood the material and were able to work on their own although they may have a question.

Distinguished: Students got it and could teach it to others or get in front of the class and explain it in their own words.

At the end of the day, I was able to go through and check out not only students' work, but assess they're understanding of their learning. This led to great conversations of students who constantly rated themselves lower than what their work proved, as well as students who rated themselves much higher than their work proved. I used this with fifth graders, so since it was upper elementary, it was a great real world skill to teach!

This also plays right in to grade percentages too, but would be amazing for those of you doing standards based grading as well!

THINK:
69% or less: Novice
70%-79%: Apprentice
80%-89: Proficient
90%-100%: Distinguished

Interested in trying these out? Get them free here!